
Recently I was asked to review ASUS India's latest offering, the Zenfone 2 Laser (ZE550KL) smart-phone. According to ASUS India, it is a great device for blog photography because of its brand new laser auto-focus feature (as fast as 0.03 seconds, which greatly reduces blurring and enhances image stabilization), and low-light imaging capabilities. Being a travel writer and photographer, they requested me to share my thoughts on the device (supplied by them) with the aid of pictures taken using the same. I present to you below what I discovered about its photography abilities.
You can have a detailed look at the phone's features / specifications here. From the perspective of the present review, following are the phone's principal features:
- Android 5 Lollipop operating system
- 4G capability
- Qualcomm MSM8916 (1.2 GHz) CPU
- 2 GB RAM
- 16 GB in-device storage, with a Micro SD slot (expandable up to 128GB)
- F2.0 Aperture; 13MP (rear) and 5MP (front) cameras
- Full HD video recording
- 5.5" display screen with Corning Gorilla Glass

Please note that I have reviewed this phone from a travel photographer's perspective. The review has been written in layman's terms for the ease of comprehension of the average user. This is not supposed to be a detailed technical review of all the features / capabilities of the phone.
Further, the review should be read in light of the capabilities of other smartphones in the genre. When I comment on any specific aspect, it is only in comparison to the results obtained from other phones' cameras. They are not to be compared to SLR's, or other photography devices. While I have shot most of the images outdoor, the opinion provided below would also hold true in case of indoor photography, though the results would wary depending upon the proficiency of the user, quality of light, and whether one chooses to use flash or not.
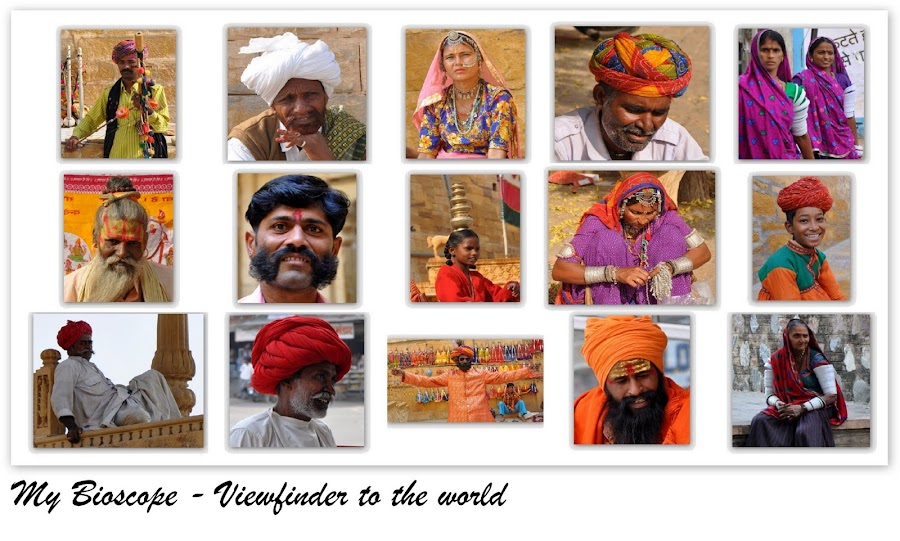
All the pictures showcased below have been taken using the Zenfone 2 Laser device and processed using the in-device features (except the white borders.)
Let me begin by making some general observations, based on personal experience, about the camera and related features in the device:
- The device comes with a lot of pre-set modes for the rear / principal camera, as well as for the selfie / front camera. For tinkerers and hands-on enthusiasts like me, there are many options to manually vary the parameters, such as: ISO, shutter speed, brightness, saturation, image aspect, white balance, EV compensation, metering mode, sharpness, etc. In other words, there's something for everybody. Most of the situations one encounters while photographing have been taken care of.
- The camera uses laser technology for focusing. In my opinion, the focusing is fast; even in low light, the lag time is not much, except when the subject is far away in low light conditions (which is to be expected). Consequently, the subjects in the images are rendered quite sharp.
- Colour vibrancy, contrast, brightness, dynamic range, tones, are in general quite good. The results, obviously, will vary depending upon the proficiency of the user and the choice of settings.
- There are also a number of de rigueur pre-set post-processing options. One can also manually fine-tune the images by varying the saturation, shadow / highlights, brightness, sharpness, contrast, hue, curves, blur, etc. I found them to be extremely useful. There's also the option to create customised user pre-sets for processing under different situations.
- The device is thin, light-weight, and has an ergonomically curved back. The back cover and the edges provide solid grip while photographing. This is a plus when shooting in crowded places, windy locations, or near the edge.
- The photographs are displayed on the screen with amazing clarity, vibrancy, and contrast.
- The device is fast and snappy, even when multiple applications are open in the background. The battery life is long and, despite heavy use, easily lasts over a day on a single charge.
- When shooting outdoors, or even in low light, I would suggest checking the 'smart brightness' option in the manual settings. The screen displays the subject and the scene clear and bright, which greatly aids composition.
All in all, it looks like a great choice for travel photographers to capture and share precious moments on the go. I will now delve in to some of the specific aspects of the camera, which will help buttress the claims made above. The images displayed below will also enable you to make an objective assessment of the camera's capabilities.
High Dynamic Range (HDR) technique is a way to capture well-exposed images in tricky light situations. The camera achieves this balance by automatically combining images taken at different exposure readings. All that the user needs to do is select the HDR mode, and hold the camera steady for awhile after clicking the shutter-release button. The results achieved are quite good, as the following images demonstrate. Without the HDR mode, and at low ISO setting, these two images would've turned out dark.


Shooting at low ISO in dim light conditions using the Low-light Mode:
The device has an in-built "Low-light" mode for photographing under conditions of dim light. This is useful for capturing images that preserve sufficient amount of detail, while at the same time conveying the mood of the scene, such as the post sun-set scene below.

Shooting at High ISO in dim light conditions using the Low-light Mode:
If you want to capture brighter images in conditions of dim light, then select the "Low-Light" mode in the device, and manually boost the ISO. The exact level of ISO would depend upon your individual artistic requirements. In the images below, I have taken the liberty to shoot at the highest ISO level of 800 in order to test the engine. Consequently, while the images are well exposed, there is visible grain and smudging in the images, which is natural at such high ISO levels. However, details have been well preserved and colour reproduction is good and vibrant. This mode would be useful in instances wherein capturing the moment over-rides the necessity of having a flawless image.
When I shot at mid ISO levels, the noise levels were quite low.


Shooting Streets / Architectures / Landscapes:
Under bright, natural light conditions, the images are near perfect. The camera captures the details in the shadows quite well, with good contrast between light and shadow regions. The colour reproduction is also excellent, with just the right amount of saturation to make them vibrant, which obviates the need for further processing. The shutter speed is fast enough to not just capture moving images without a blur, but also capture them right at the moment where you have positioned them in your composition.
I have presented below three different instances of day-light photography.
First is street photography, which is all about the moment and the interplay of light & shadows. The image below speaks for itself.

The second image depicts architectural photography. Despite the Church facing the sun and having a white façade, it is perfectly illuminated, with no details being lost in the highlights. Details in the shadows are also good. All this without using the HDR mode!

Third image showcases landscape photography. Here, the depth of field is good; far away areas are clearly visible and are sharp. Since the image below was shot in HDR mode, it's perfectly exposed. The colour quality, tones and contrast are excellent.

Shooting Macros:
Under the Macro mode, which is used to photograph small objects in great detail, the camera's processor automatically creates a depth of field effect around the selected subject after clicking on the shutter-release button. The result is quite good; the blur-effect looks quite natural.

Shooting Selfies / Flash Photography:
Selfies are du jour. There are various pre-set modes available in the camera to capture the right image. The most important and the most used one is the 'Beautification Mode'. In this mode, the image quality is enhanced by: increasing the brightness level of the subject; imparting softness to facial features; and removing blemishes. Consequently, somebody like me can also be made to look good ;-)
The flash is quite powerful and illuminates the subject and its immediate surrounding quite well. There is an option to quickly share the images on multiple social-media platforms and other productivity tools.

I would end by saying that I am quite pleased with the results. The device has all the features, backed with capability, that I would look for in a camera-phone in today's times.
Thank You!


3 comments:
Hi, Really great effort. Everyone must read this article. Thanks for sharing.
It was very useful for me. Keep sharing such ideas in the future as well. This was actually what I was looking for, and I am glad to came here! Thanks for sharing the such information with us.
Hey keep posting such sensible and significant articles.
Post a Comment
Thank you for visiting My Bioscope and I appreciate your valuable comments.
Please do mention your Name at the end of the message.